
Flash Animation - Frames
You've created a movie of at least 11 frames. At the beginning you set your frame rate to 12fps. Change the fps to 6 and play the movie. See how the animation has reduced by half? Continue to play with the frame rate to get an idea of how that changes the way your movie works.
Adding and Deleting Frames
The previous exercise showed you how you can adjust the frame rate of your animation to adjust the time. But you also noticed how this affects your movie.
Step 1 - Click on the Layer with your Frog and Insert a Frame. Notice how this is different from a Keyframe. (Image 1) Add five more frames. These frames indicate no change in content. The small square shows that the next frame will either be a Keyframe or a blank keyframe. Since the next frame here has a solid black dot it is a keyframe. A white dot means a blank keyframe. (Image 2) |
Image
1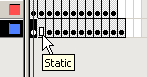
|
Image
2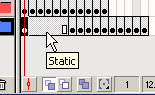
|
| Step 2 - Now play your movie. See the difference? | ||
| Step 3 - Try deleting some of the frames on either one of your layers? Is there a difference? | ||
| Step 4 - Experiment with adding and deleting frames until you like some of the changes. | ||
Copying Frames
The previous exercise showed you how you can add and delete frames. This exercise will show you how you can copy and reverse frames to create a loop.
| Step 1- Click on the Layer with your Frog... this selects all the frames on the layer. |
|
| Step 2- Move the cursor over the selected frames click and drag to the right - while still holding the mouse button down, press ALT (Win) or OPTION (Mac) and release the mouse. You've now duplicated the frames. | 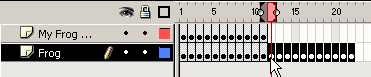 |
| Step 3 - With frames 12-22 still selected choose Modify > Frames > Reverse | |
| Step 4 - Continue to play with copying frames. |
Flash
Interface | Flash Tools |
Animation | Tweening | Symbols/Instances
| Buttons
Timeline | Properties
| Keyframes | Onion
Skinning | Frames | Testing